SwiftUI・ナビゲーションバー(Navigation Bar)を完全攻略する!
SwiftUIでナビゲーションを使う
今回もXcodeの新しいSwiftUIというビルダーを使って、ナビゲーションバー(Navigation Bar)を付けていきたいと思います。
SwiftUIでの元のコード
まずはナビゲーションバーを付ける前のコードはこちらです。
struct ContentView: View {
    var body: some View {
        List {
            ForEach(0..<5) { (index) in
                Text("Row \(index)")
            }
        }
    }
}

SwiftUIでナビゲーションバーを付ける前
ではこれにナビゲーションバーをつけていきたいと思います。
ナビゲーションビュー (NavigationView)
まずは body ビューの中身を全て NavigationView の中に入れていきます。
struct ContentView: View {
    var body: some View {
        NavigationView {
            List {
                ForEach(0..<5) { (index) in
                    Text("Row \(index)")
                }
            }
        }
    }
}
するとプレビューの画面ではこのようになります。

全体にNavigationViewを付けた後のプレビュー画面
下から上にスワイプした時にデフォルトのナビゲーションバーが見えます。
色の変え方等は後ほど説明しますが、まずはタイトルを付けてみましょう。
ナビゲーションバータイトル (NavigationBarTitle)
NavigationBarTitle を付けるには、 NavigationView のクロージャーの中の最後に .navigationBarTitle() を付けます。
struct ContentView: View {
    var body: some View {
        NavigationView {
            List {
                ForEach(0..<5) { (index) in
                    Text("Row \(index)")
                }
            }
            .navigationBarTitle("タイトル")
        }
    }
}
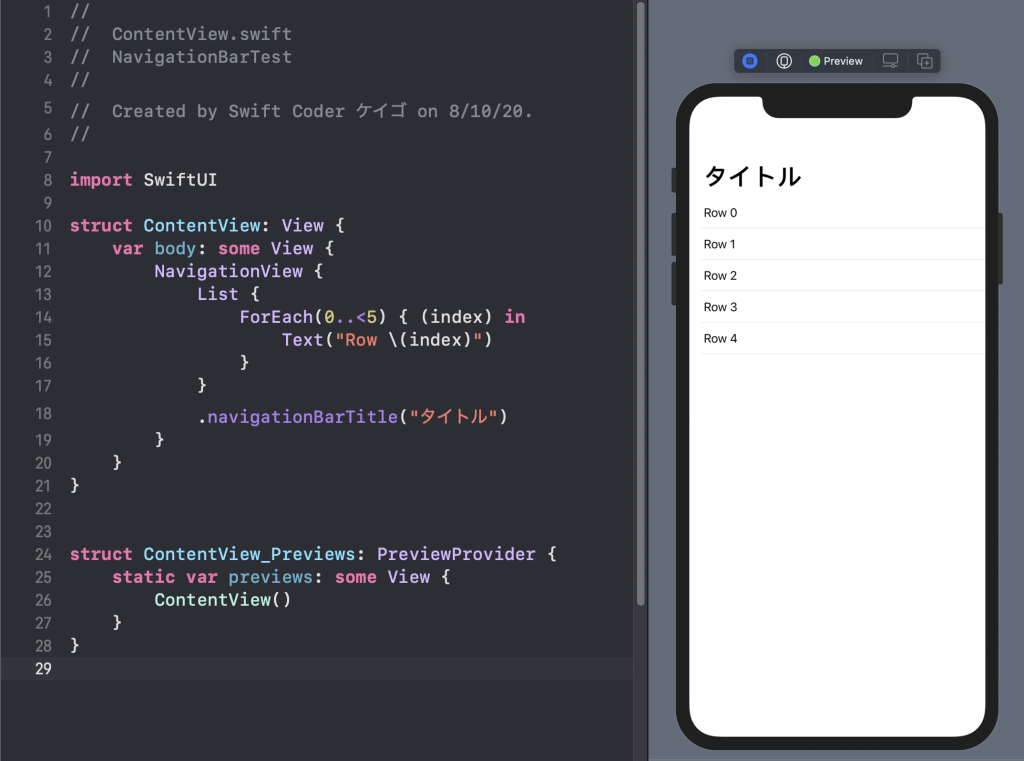
NavigationBarTitleがついた。
現状、NavigationBarTitle はデフォルトで大きいタイトル (large title) になっています。
タイトルを Large Title でなく、普通の大きさにするには、 NavigationBarItem.TitleDisplayMode を変える必要があります。
.navigationBarTitle("タイトル")
を次のコードに置き換えます。
.navigationBarTitle("タイトル", displayMode: .inline)
すると、プレビューはこのような様になります。

ノーマルサイズのNavigationBarTitleに変えた。
ナビゲーションバーにボタンを付ける (NavigationBarItems)
では次にナビゲーションバーの左右にボタンを付けていきたいと思います。
ナビゲーションボタンを付けるには .navigationBarItems(leading: View, trailing: View) を使います。leading はバー左側、trailing ではバー右側にビューを付けるのに使います。
どちらの中にはViewクラスが入るので、Button自体を入れてもいいし、HStackでもImageを入れることもできます。
今回は左側にはButton一つ、右側には二つのButtonを入れていきたいと思います。
.navigationBarTitle("タイトル")
.navigationBarItems(leading: Button(action: {
    print("左のボタンが押されました。")
}, label: {
    Text("左ボタン")
}), trailing: HStack {
    Button(action: {
        print("右のボタン1が押されました。")
    }, label: {
        Text("右1")
    })
    Button(action: {
        print("右のボタン2が押されました。")
    }, label: {
        Text("右2")
    })
})

ナビゲーションバーにボタンを付けた。
もちろんボタンの色を変えたかったら、Button の中の Text の .foregroundColor() を変えます。
Button(action: {
    print("右のボタン1が押されました。")
}, label: {
    Text("右1")
        .foregroundColor(Color.black)
})
ナビゲーションバーの色などを変える
現在(2020年8月11日)、body の中で色を変えることは出来ません。しかし、イニシャライザーの中で UINavigationBarAppearance() を使うことで変えることができます。
init() {
    setupNavigationBar()
}

func setupNavigationBar() {
    let appearance = UINavigationBarAppearance()
    appearance.configureWithOpaqueBackground()
    appearance.backgroundColor = .purple
    appearance.titleTextAttributes = [.foregroundColor: UIColor.white]
    appearance.largeTitleTextAttributes = [.foregroundColor: UIColor.white]
    UINavigationBar.appearance().standardAppearance = appearance
    UINavigationBar.appearance().scrollEdgeAppearance = appearance
}
プレビューの様子はこの様になります。

ナビゲーションバーの色を init() の中で変えた。
まとめ
いかがでしたか?ナビゲーションバーの色などの設定が body のなかで出来ないのは少し面倒ですが、分かればそんなに難しくないのでいいですね。
これでナビゲーションバーはマスターできましたでしょうか。
何か質問・感想等があれば、ぜひコメント欄でお知らせください!!